TransferRIP FAQs
Start by choosing a topic below
Does TransferRIP working with MAC OS?
No, but you can use Windows encoding softwares like “Parallels” or “Bootcamp”.
Does TransferRIP working with Windows 10?
Yes, the newest version supports Windows 10.
Does the TransferRIP working on 32 or 64 bit systems?
FOREVER TransferRIP is working on 32 and 64 bit systems. Any problems that may occur, are caused by using different settings.
Here are 3 possibilities:
- Check if your background services are working (see attached images for guiding you through windows)
- Delete the content of your temp folder
- Stop your anti-virus software
Can I use TransferRIP also for my CMYK printer?
You can use the TransferRIP with the following printers:
- OKI ES7411WT / C711WT / Pro7411WT (A4)
- OKI ES9420WT / C920WT / Pro920WT (A3)
- OKI Pro8432WT (A3)
- OKI C800 Series
Does TransferRIP override the internal printer color density controls?
TransferRIP is not able to override these settings. That is the reason why it is that important to leave the settings at 0.
TransferRIP users have the advantage to install their printer and start working. If you do not use the TransferRIP, you have to change the settings before you can start.
I cannot see and load any file in my TransferRIP
Make sure that you are really in Step 2 of 5 and not in Step 1, where you only can import the profiles which are needed to use the software
I’m having trouble importing Corel Draw and Adobe Illustrator files.
TransferRIP supports the following file format: JPG, TIFF, PNG, PDF, EPS, PSD, BMP
Imported files are corrupt. Showing no image preview & "0" pages
If imported images are having the following issues:
- Showing no “pages” (right-hand side of the job list)
- No image preview (bottom left)
- Displays an icon of a person (left-hand side of the job list)
If all of these errors are happening you should unistall and re-install the TransferRIP.
My TransferRIP crashes as soon as my job should go to the color settings.
Delete the content of your temporary files folder. You can use the programm “cleanmgr” by typing it in the search of windows start menu. It is installed on every PC.
Restart your computer and reload your job.
If it is still not working, make sure that your temporary files folder is directly on your Hard Drive (usually C: ). Such crashes may occur due to long folder paths. Please turn off all Anti-Virus and System Boost Software which may be running in the background.
If it is still doesn’t working, you must turn on the background services:
- Right click on “Computer”
- Select the last option
- Click on the right side on advanced system settings
- Go to the visual effects
- Change to the middle tab and change the button to background services.
- Restart the computer and load the job again.
After these steps are complete, TransferRIP will work.
The registered version still shows the demo safety grid. What am I doing wrong?
Upgrading to the full version of the TransferRIP does not remove the safety grid on your demo files. If you are upgrading to the full version from the demo version, you have to reload your files to the TransferRIP job list.
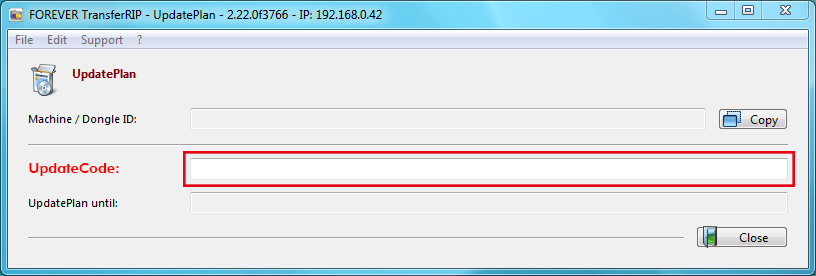
How to insert the UpdatePlan code?
• Click the „Register“ button in the main menu
• The window below will appear
• Copy the UpdatePlan code from „#“ to „#“
• Paste the code into the UpdatePlan field
• The UpdatePlan Date will be updated in the last field
Example UpdatePlan Code:
#transferRIP WTT&XXXX-XXXX-XXXX-XXXX-XXXX-XXXX&UN_000111222&YYYY-MM-DD#
I cannot load any Update. It shows that the Port 4430 is not working
Turn off your fierwall or change the settings to allow TransferRIP to use the port for updates
Working with multiple computers: Problems with the Dongle.
If you are experiencing problems with the Dongle after installing the TransferRIP on a second computer.
Follow the Steps below:
- Close the TransferRIP software
- Remove the Dongle
- Re-Insert the Dongle
- Wait a few seconds before starting the TransferRIP
Now in Demo mode?
- Click on “Register”
- Paste your UpdatePlan Code and confirm
- The problem should now be fixed
Why do I have lines on my transfer?
These lines only appear on the Demo version of the TransferRIP Software. The lines are removed after upgrading to the full version.
You can upgrade to the full version by clicking on the “Register” button inside the TransferRIP software.
If you require a TransferRIP licence, please contact us for further information.
How can I rasterize my design?
The quickest way to Rasterize an image or design, is by using the FOREVER TransferRIP Software.
Every image need different settings. To find the best settings for your design, you have to test and use the preview feature to see if the result looks like you or your customer want it. After some test you will have enough routine to handle rasterized images even withou checking them before.
What does "LPI" mean?
Lines Per Inch
It is a measurement of printing resolution. Defined in the TransferRIP by how close together the lines in a halftone grid are. High LPI indicates greater detail and sharpness. The quality of printer device or screen determines how high the LPI will be.
What does "RIP" mean?
Raster Image Processor
Can I use the rasterization for white garments?
To rasterize an image for white garments, choose “Use Screening as configured as a Mask, recommended for Light Media”. This will delete all white and the bright colours.
What are the best settings for rasterization?
The rasterization settings depend on how bright or dark the image is and which style you or your customer prefer.
If you would like to print onto dark garments and your image has lots of dark colors, then the following settings can be used:
- Choose the Raster (Screening) setting for “Dark Media”
- Mask: Between 25-28
- Shadow Tolerance: Between 150-180
- Dot Shape: Euclidean (Standard Setting), but you can choose your preferred option.
How does the "Micro Mask Percentage" work?
The percentage means the amount of information which will be deleted from your image.
If you have a small mask like 30 or 35, 20% could be too less, because the holes are small and the coating of the B-Paper will melt into them.
What are the suggested "Micro Mask Percentages"?
I would prefer minimum 24%, but depending on the mask. If you have a mask like 20 LPI, you can also use 10%. If you have a small mask like 30 or 35, 20% could be too less, because the holes are small and the coating of the B-Paper will melt into them.
If you just want to increase the washabilty without deleting that much from the original design, you can also use a percentage of 4 % in combination with 10 LPI Mask.
There is no standard settings. Try and find the best setting.
Can I save my jobs?
Yes and No. Each job that you upload will remain in your job list and preserve all settings and changes made. Only by deleting the file from the job list, are all settings lost.
If you want to make images available for future jobs, simply keep the file in your TransferRIP job list. New jobs can be easily uploaded when needed.
Even if you delete the original file from your hard drive, the job will stay in TransferRIP.
Postscript Issues
Answer:
Do not use a USB cable that is longer than 1.8 Meters (6 Feet).
Images being Cut Off
If your image contains only white and it is being cut off within the TransferRIP preview windows, then please make sure you have saved your image in the CMYK colour mode and not the RGB colour mode.
Why is my image printing the wrong way?
If your images are being cut-off, like the file is printing the landscape instead of portrait, please try the following:
- Delete/Remove the file from the TransferRIP software (So that the file has disappeared from the job list in Step 2).
- Next, choose your paper size in the drop-down box at the bottom of the screen (Make sure that the chosen size is the same size as the saved image/design).
- Now, re-import your image/design to the TransferRIP software.
- Continue through the others steps and make a test print.
- Your image should print without being cut-off.
If the above steps haven’t worked, then this issue could be as follows:
- The positioning of the paper in the Multi-Purpose Tray is wrong. Rotating the paper will fix this issue.
- The USB Cable is too long (click here for more information)
After rasterizing my design, the colors look really bad. Why?
Reason:
When you rasterize your design, you create “holes” in the colors of your image. The material color will show through these “holes” and mix optically with the toner color.
The human eye blends these two colors together to form a mean value. In order to achieve better colors, it is advisable to increase the brightness of the design before rasterizing it. This will counteract this degradation of color and may lead to your desired look. The brighter your image is, the smaller the dots will be.
I want to print A4XL, but my prints come out in A4 size. Why?
Make sure that you checked the box “Force Manual Tray and User definied Media Size”.
Can I rotate my artwork?
At this current moment, it is not possible to rotate images within the TransferRIP software. Although this feature will appear in a future version of the software.
A White background appears on my image.
Answer:
Try resaving the file by using a different software. For example; Adobe Photoshop or Illustrator
Is it possible to remove a white background, but keep the White in the image?
TransferRIP allows you to remove a specific color in your design. Removing this color from the whole design. Files must be saved without backgrounds, in order to keep the a color in the design.
Even if there is no white in the image, white is not removable.
I have some kind of drops on my print-out A-Foil. Especially visible on the white toner.
Either you are working with the wrong profile, or you have changed the Media Setting from Transparency to another option.
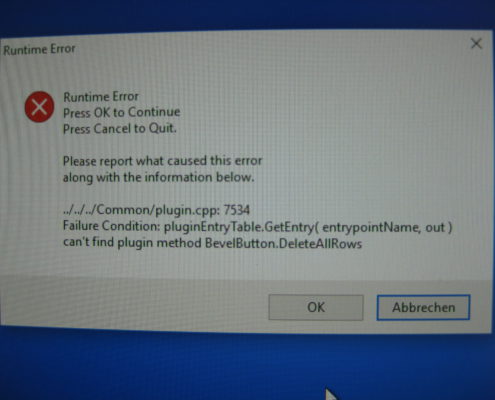
Error Message: Runtime Error 7534
If the following Error Message appears:
The Reason for this error message is because parts of the program are missing from the program folder.
Solution:
- Repeat the installation process.
- If the same error message appears, please make sure the virus scanner, which may have prevented important files from being installed, it turned OFF.
DE:
Teile des Programms liegen nicht mehr im Programmordner.
- Den Installer erneut laufen lassen.
- Falls das Problem weiterhin besteht, sollte man die Virenscanner prüfen. Diese haben evtl. fehlerhafte Pakete im Update erhalten.
Error Message (0): I cannot install TransferRIP. It always shows a "0" error.
If you are seeing the “0” error, please try one of the following:
- Make sure that your temporary files folder is empty.
- Turn off the Firwall and Anti Virus software before installing the TransfeRIP.
- Shorten the TransferRIP file paths:
- Right-Click on the “Computer” icon.
- Click “Properties”
- Click “Advanced System Settings”
- Under the “Advanced” tab, Click “Enviroment Variables”.
- Under the “User variables”, double-click the “TEMP” line.
- Delete all the information, so that only “%USERPROFILE%Temp” is left.
- Click “OK” and repeat the process for the next line (“TMP”).
- Click “OK” and “OK” again.
If the Steps above didn’t work…
- Repeat the Steps above
- Replace “%USERPROFILE%Temp” with “C:“
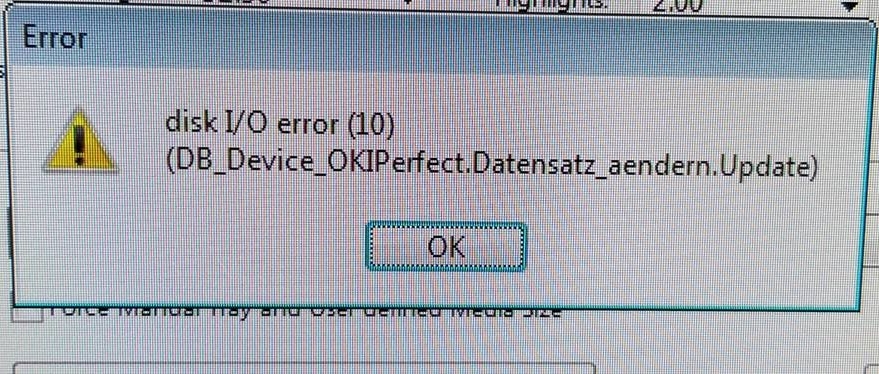
Error Message: disk I/O error (10)
If the TransferRIP software is displaying the disk I/O error (10) message, then please follow the steps below to solve the issue.
- open the TransferRIP
- delete all profiles
- close the TransferRIP
- open the folder “C:\ProgramData\MGE_Progs\MGE_Device”
- delete the file “MGE_Device.rsd”
- open the TransferRIP
- load your profiles again
Now the TransferRIP works.
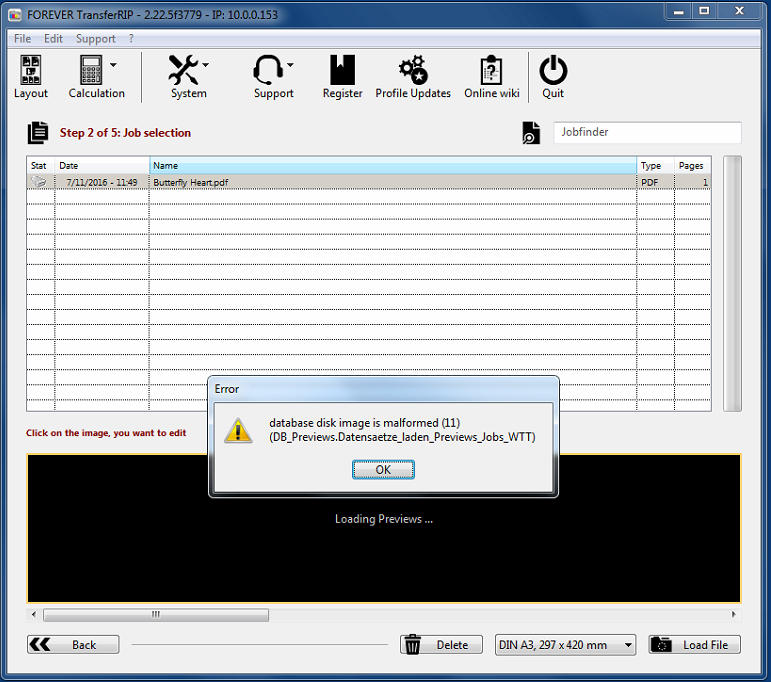
Error Message (11): Database disk image is malformed
If the TransferRIP software is displaying the malformed database error (11) message, then please follow the steps below to solve the issue.
English:
- Quit the TransferRIP
- Open the following folder: “C:\ProgramData\MGE_Progs\transferRIP WTT“
- Delete the following files:
- “MGE_Previews.rsd“
- “MGE_Previews.rsd-shm“
- “MGE_Previews.rsd-wal“
- Restart the TransferRIP
- Delete all Jobs from each Colour Profile
- The error (11) is now solved.
Once the steps have been followed the malformed database error (11) message will no longer appear.
Deutsch:
- TransferRIP beenden
- In den Ordner “C:\ProgramData\MGE_Progs\transferRIP WTT“ wechseln
- Löschen/Entfernen Sie folgende Dateien:
- „MGE_Previews.rsd“
- „MGE_Previews.rsd-shm“
- „MGE_Previews.rsd-wal“
- TransferRIP neu starten
- Löschen Sie alle vorhandenen Dateien aus allen Geräteprofilen
- Der Fehler (11) sollte nun gelöst sein
Wenn Sie allen oben genannten Schritten gefolgt sind, sollte der Fehler (11) nicht mehr angezeigt werden.
Error Message: "Demo Period expired or no valid internet connection"
If the below error message appears after installing the TransferRIP software, then you need to add the TransferRIP software to the saved list in your Windows firewall window. Click all 3 checkboxes before activating the change.
“Demo Period expired or no valid internet connection”
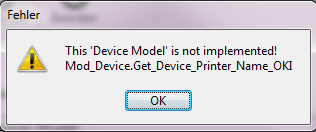
Error Message: "Device Model" not implemented (OKI Pro8432WT)
If you have installed the OKI Pro8432WT color profiles for the TransferRIP software and you see the below message: “Device Model not implemented…”
You are required to update the TransferRIP software to the latest version: “2.28.10f3943″
Please click here to find out how to update the TransferRIP software.
Error Message: "I’m Quitting now!"
If you are trying to update the FOREVER TransferRIP software with an update plan – you may receive an error message that says, “I’m quitting now”.
If this is the case:
- Make sure that you copy the whole code from and including hashtag to hashtag (“#”).
#transferRIP WTT&PFHD-IPNA-OCR0-2PFH-DIPN&UN_????????&2022-12-31#
FAQs didn’t solve your problem?
Here are several ways to contact us
Downloads
Check out our Downloads page for Transfer Instructions, Printer Manuals & more.
Contact Support
We’re here to help with all your issues.
Get Support by chat, our forum or email.
Newsletter
Sign-up for all the latest FOREVER White Toner Transfer News, Reviews, Tips&Tricks and much more.



You must be logged in to post a comment.